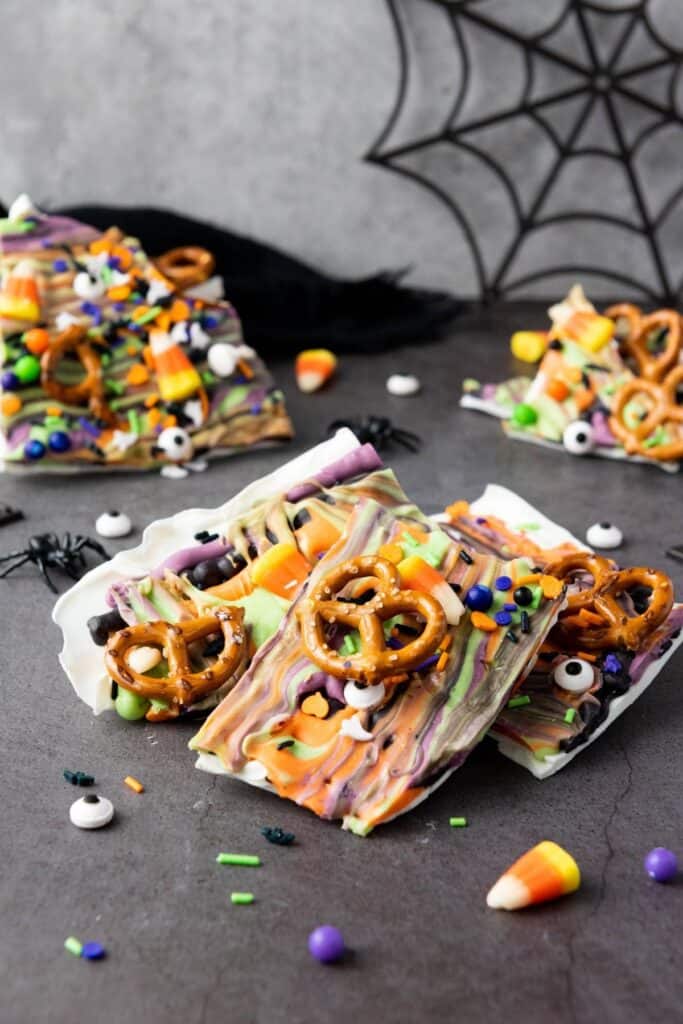
Halloween Bark
Pumpkin carving gets all the hype in October, but if you ask me, the real fun starts with candy bark. Halloween Bark is my go-to when I want something festive without the planning headache. It’s quick to make, doesn’t need an oven, and works with whatever candy bits or crunchy toppings are hanging around the pantry. No stress, no fuss, just color, texture, and a little bit of chaos in the best way.
This post may contain affiliate link(s). As an Amazon Associate, I earn from qualifying purchases. See Disclosure.
I’ve been making candy bark for years, and I still look forward to it every Halloween. It’s one of those treats that’s actually more fun when it’s messy. The swirls never turn out the same twice, and that’s part of the charm. Some batches are bold and bright, others lean spooky and dark. You can get as creative as you want or keep it simple with just a couple of colors.
The Backyard Table
Recipes for Summer Cookouts
With over 50 pages of foodie love, The Backyard Table features Chef Jenn's BEST recipes for outdoor eating and entertaining. Every recipe is created, tested, and loved by Chef Jenn, with NO AI! Get it now, at a special introductory price of $7.99 and level up your outdoor dining.
This is a digital product. You'll receive an instant download link after purchase.

Get ad-free recipes like Grilled Corn Guacamole, Grilled French Onion Burgers, Deviled Egg Pasta Salad, Blueberry Grunt, and so many more!
It’s also great for parties or school lunches. I pile it into a Halloween bowl and set it out, and it usually disappears before anyone even asks what it is.

Ingredients
- White candy melts – You’ll find these in the baking aisle at most craft stores or you can order them online.
- Orange candy melts
- Purple candy melts
- Green candy melts
- Black candy melts
- Candy corn – A little goes a long way, but I always have some on hand for Halloween recipes. Buy in bulk if you can or snack on the leftovers.
- Mini pretzels – I usually use mini twists, but any shape works. Just break them up a bit so they scatter nicely.
- Halloween-themed sprinkles – If you’re like me and have a sprinkle stash, this is a good time to dip into it. Otherwise, there are fun themed mixes online.

How To Make Halloween Bark
Scroll down for the full recipe card with exact measurements and printable instructions.
Start by lining a baking sheet with parchment paper or a silicone baking mat. I always use a rimmed baking sheet for this. It keeps everything contained and makes it easier to carry the tray to the fridge later.
Melt the white candy melts using a microwave-safe candy melting pot. Heat in 30-second intervals, stirring each time until it’s smooth. I love these pots because they’re easy to handle and the spout makes pouring way less messy.

Once the white base is melted, pour it onto the lined pan. Use an offset spatula to spread it out into an even layer. You’re aiming for about a quarter inch thick. It doesn’t have to be perfect, just even enough for your toppings to sit well.

Melt each of the colored candy melts in separate microwave-safe containers, using the same method. I usually work with one color at a time so everything stays warm and pourable.

Drop spoonfuls of each melted color randomly over the white layer. Try to spread them out so you’ll have space to swirl without turning the whole thing into mud.
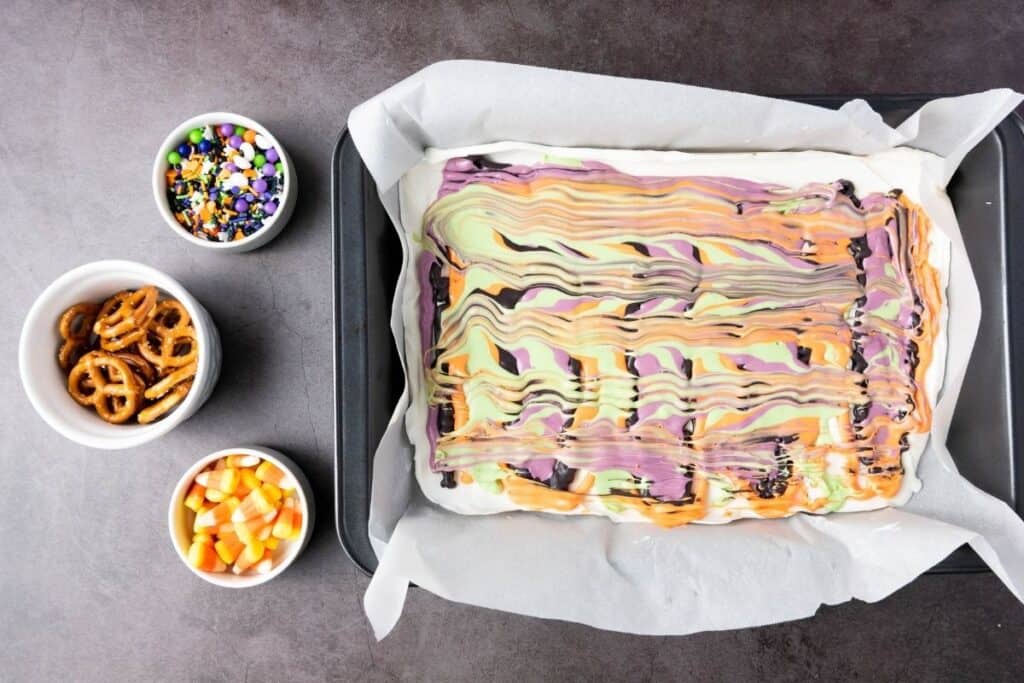
Use a skewer or thin-tipped decorating comb to drag through the colors. Make little loops or figure-eights to create those spooky marbled patterns. You don’t need to overthink it. Just keep it light and don’t press too deep or you’ll mess up the base.
While it’s still soft, sprinkle on the candy corn, broken pretzels, and all the Halloween sprinkles you like. I use my fingers or a silicone spatula to gently press everything into the surface. You want the toppings to stick once it hardens.

Let the tray sit at room temperature until the bark firms up. If you’re short on time, or your kitchen’s warm, slide the whole thing into the fridge.
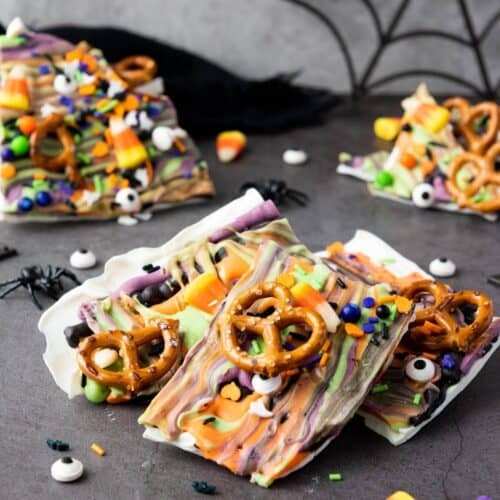
Once the bark has set completely, break it into pieces. For a more rustic look, just snap it with your hands. If you want cleaner chunks for gifting or serving, use a serrated utility knife to cut through. It gives nice clean edges without shattering the candy.

Chef Jenn’s Tips
- Always line your pan with parchment or a silicone mat. Wrestling hardened candy off a bare baking sheet is not the kind of Halloween scare anyone needs.
- Don’t stress about your swirls. The fun of this recipe is that every batch turns out different.
- Use whatever you’ve got in your pantry. Chocolate chips, crushed cookies, chopped nuts, candy eyes, just toss them on.
- Work quickly with the colored melts. Once the white layer starts to cool, swirling gets trickier.
- Store in the fridge if it’s warm in your kitchen. It keeps everything firm and crunchy.
Recommended


Serving Suggestions
Halloween Bark is made for sharing. I like putting it on a big party platter next to caramel apples, popcorn balls, or brownies for a Halloween movie night. You can also bag up a few pieces for trick-or-treat handouts or toss a chunk in a lunchbox for a fun October treat.
Storage
Keep your bark in an airtight container at room temperature for up to two weeks. If you’re stacking pieces, use parchment paper between the layers. You can also freeze it, lay the bark flat on a tray to freeze, then transfer to a freezer bag and store for up to two months.
Halloween Bark
Equipment
Ingredients
- 12 oz white candy melts
- 1/4 cup orange candy melts
- 1/4 cup purple candy melts
- 1/4 cup green candy melts
- 1/4 cup black candy melts
- 1/2 cup candy corns
- 1/2 cup mini pretzels broken into pieces
- Halloween-themed sprinkles
Instructions
- Line a baking sheet with parchment paper or a silicone mat. This keeps the candy from sticking and makes cleanup easier.
- Melt the white candy melts in a microwave-safe bowl in 30-second intervals, stirring until smooth and fully melted.
- Pour the melted white candy onto the lined pan and spread into a layer about 1/4 inch thick using an offset spatula or spoon.
- Melt the orange, purple, green, and black candy melts in separate bowls using the same method.
- Drop a spoonful of the colored melts over the white base. Try to space them out for better swirl patterns.
- Drag a skewer or decorating comb through the colored candy to create marbled swirls. Avoid overmixing so the colors stay distinct.
- Sprinkle candy corn, pretzel pieces, and Halloween-themed sprinkles over the top. Press down gently so everything sticks.
- Let the bark cool at room temperature for 1 to 2 hours, or chill in the fridge for about 30 minutes.
- Once set, break into pieces by hand or use a sharp knife for more even edges.
- Store in an airtight container at room temp or refrigerate if your kitchen is warm.
Notes
Chef Jenn’s Tips
- Always line your pan with parchment or a silicone mat. Wrestling hardened candy off a bare baking sheet is not the kind of Halloween scare anyone needs.
- Don’t stress about your swirls. The fun of this recipe is that every batch turns out different.
- Use whatever you’ve got in your pantry. Chocolate chips, crushed cookies, chopped nuts, candy eyes, just toss them on.
- Work quickly with the colored melts. Once the white layer starts to cool, swirling gets trickier.
- Store in the fridge if it’s warm in your kitchen. It keeps everything firm and crunchy.
Nutrition
A Note on Nutritional Information
Nutritional information for this recipe is provided as a courtesy and is calculated based on available online ingredient information. It is only an approximate value. The accuracy of the nutritional information for any recipe on this site cannot be guaranteed.